
Chapter 7: Active Information Gathering
In the previous post we explored some ways to obtain information about a user without directly interacting with him, but in this post we will explore the most common ways to obtain information about a user that involve direct interaction with target services.
DNS Enumeration
The Domain Name System (DNS) is a distributed database that allows the translation of domain names into IP addresses. The database follows a hierarchical structure divided into several zones, starting with the root level domain. Let’s learn how DNS works before learning how to enumerate it.
The next image shows the hierarchical structure of DNS:
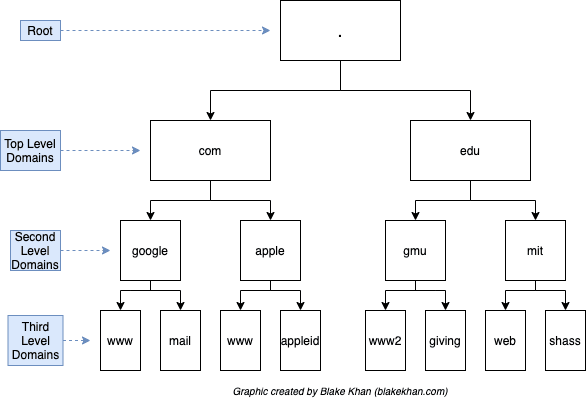
The root Server contains the IP of the top level domain servers and they contain the addresses of second level domain servers etc.
But how is this structure used?
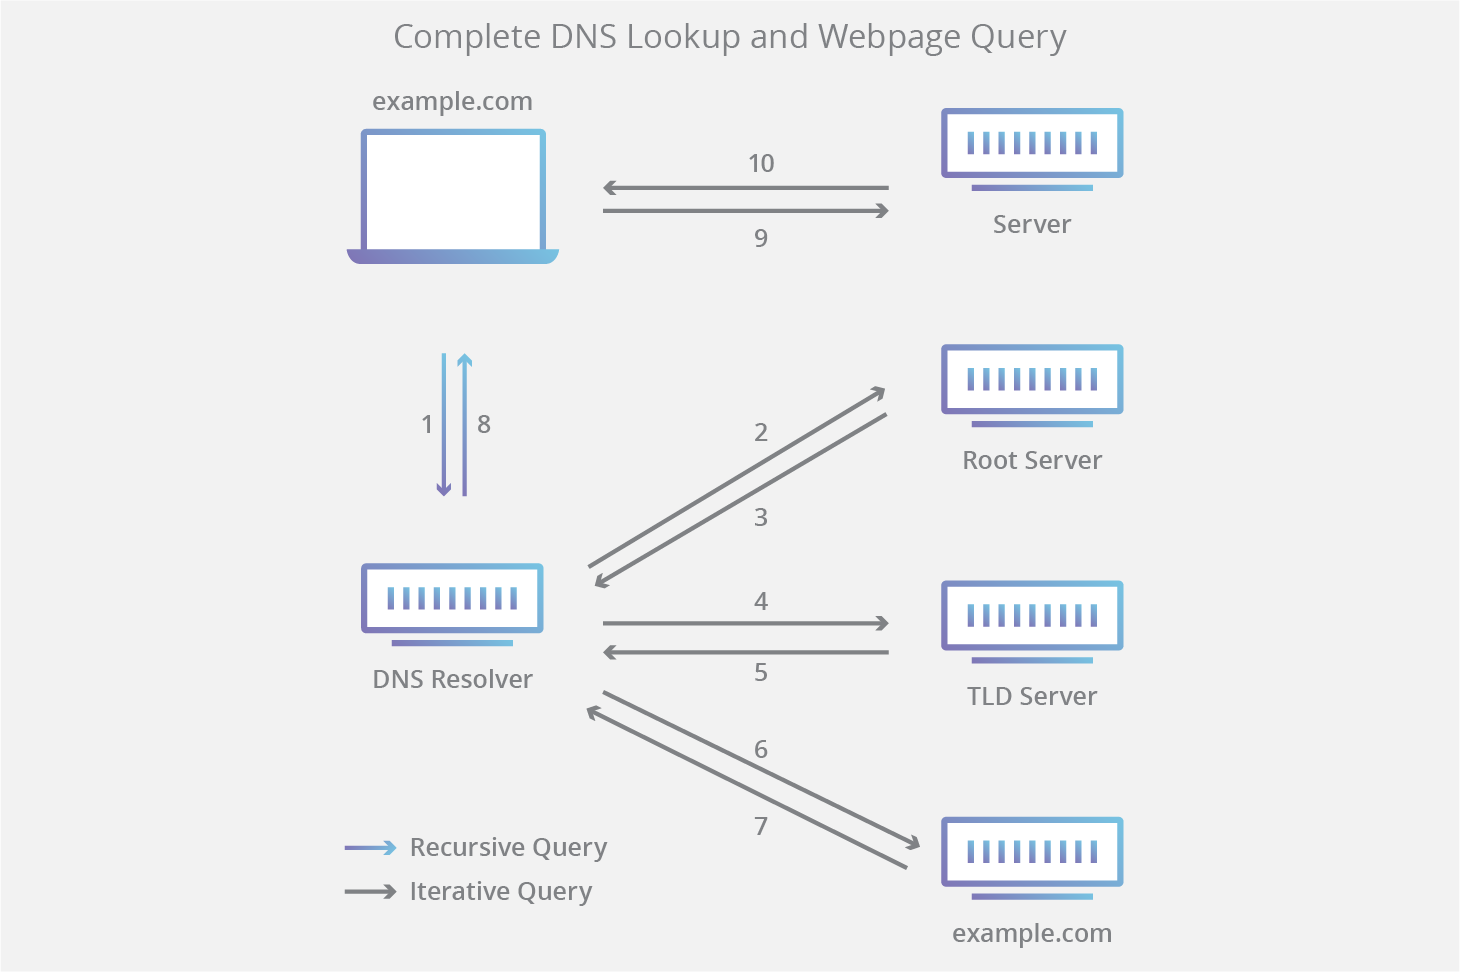
When you search for a hostname like “example.com” in your browser, the host name is sent to the OS DNS client, which is going to forward a request to the configured name server. This name server is known as a DNS recursor and is the one who will interact with the DNS structure, not your host:
- The recursor send the query to the root domain.
- The root domain answers with the address of the Top level domain (TLD). In this example the TLD will be .com.
- The recursor sends the query to the TLD .com.
- The TLD will answer with the Second level domain example.com address.
- The recursor will send the query to the example.com DNS server (Authoritative Name Server). An authoritative name server contains the DNS records in a local database known as a zone file. There are usually two zone files for each domain:
- Forward lookup zone: Translates names into IP addresses.
- Reverse lookup zone: Translates IP addresses into names.
- The authoritative name server answers with the corresponding IP address.
- The recursor sends the IP back to the DNS client that runs inside the host and it will be able to access to the correct host and load the webpage.
To avoid doing this process everytime, browsers and name servers have a cache that stores DNS records.
There are different type of DNS records that a domain can use:
- NS: Nameserver records contain the name of the authoritative servers that host DNS records for a domain.
- A: Host record contains the IP address of a hostname.
- MX: Mail Exchange records contain the name of the servers that handle email for that domain.
- PTR: Pointer Records are used in reverse lookup and they contain records associated with an IP address.
- CNAME: Canonical Name Records are used to create aliases for other host records.
- TXT: Text Records contain arbitary data that can be used for various purposes.
Let’s do some practical examples:
First, we will use the host command to find the IP address of www.google.com:
1
2
3
❯ host www.google.com
www.google.com has address 142.250.201.68
www.google.com has IPv6 address 2a00:1450:4003:80c::2004
The host command will search for an A record unless we specify what we want. We can use the -t option to specify what kind of record we are searching for:
1
2
❯ host -t mx google.com
google.com mail is handled by 10 smtp.google.com.
Note that I searched for the MX record, but instead of the www.google.com i used the google.com domain.
An important technique to obtain domain names is using brute force with wordlists. We could create a bash script that executes the host command searching for exiting subdomains. There are tools that can do this like gobuster or wfuzz.
We could also do reverse lookups brute forcing the IP addresses within a network.
DNS Zone Transfers
A zone transfer is a database replication between related DNS servers which the zone file is copied from a master DNS server to a slave server. Theoretically, just authorized DNS servers should be able to ask for a zone transfer, but many administrators misconfigure DNS servers and anyone can reccive a copy of the DNS zone file.
We can use the host command again with the -l option to ask for a zone transfer. We must provide the domain name and the DNS server address/name. Since we need a DNS server name to do the zone transfer, we can first do the host -t ns google.com to obtain the names and then try the zone transfers for each DNS server:
1
2
3
4
5
6
7
8
9
10
11
12
13
14
15
16
17
18
19
20
21
22
23
24
25
26
❯ host -t ns google.com
google.com name server ns1.google.com.
google.com name server ns3.google.com.
google.com name server ns2.google.com.
google.com name server ns4.google.com.
❯ host -l google.com ns1.google.com
Using domain server:
Name: ns1.google.com
Address: 216.239.32.10#53
Aliases:

; Transfer failed.
❯ host -l google.com ns2.google.com
Using domain server:
Name: ns2.google.com
Address: 216.239.34.10#53
Aliases:

; Transfer failed.
❯ host -l google.com ns3.google.com
Using domain server:
Name: ns3.google.com
Address: 216.239.36.10#53
Aliases:

; Transfer failed.
We can see that Google has everything properly configured and we are not allowed to do zone transfers. We could also run a script to do this automatically, but there are tools that already do this, like DNSRecon: dnsrecon -d google.com -t axfr where -d allows us to specify the domain and -t to specify the type of enumeration that we want (in this case, a zone transfer).
Another tool is the DNSenum. We can run this tool against the zonetransfer.me (a domain created specifically to allow zone transfers and do tests). Here we can see part of the output:
1
2
3
4
5
6
7
8
9
10
11
12
13
14
15
16
17
18
19
20
21
22
23
24
25
26
27
28
29
30
31
32
33
34
35
36
37
38
39
40
41
42
43
44
45
46
47
48
49
50
51
52
53
54
55
56
57
58
59
60
61
62
63
64
65
66
67
68
69
70
71
72
73
74
75
76
77
78
79
80
81
82
83
84
85
86
87
❯ dnsenum zonetransfer.me
Smartmatch is experimental at /usr/bin/dnsenum line 698.
Smartmatch is experimental at /usr/bin/dnsenum line 698.
dnsenum.pl VERSION:1.2.4

-----   zonetransfer.me   -----


Host's addresses:
__________________

zonetransfer.me.                         5        IN    A        5.196.105.14


Name Servers:
______________

nsztm1.digi.ninja.                       5        IN    A        81.4.108.41
nsztm2.digi.ninja.                       5        IN    A        34.225.33.2


Mail (MX) Servers:
___________________

ALT1.ASPMX.L.GOOGLE.COM.                 5        IN    A        142.250.153.26
ASPMX2.GOOGLEMAIL.COM.                   5        IN    A        142.250.153.26
ASPMX4.GOOGLEMAIL.COM.                   5        IN    A        142.250.150.27
ASPMX.L.GOOGLE.COM.                      5        IN    A        108.177.15.27
ASPMX3.GOOGLEMAIL.COM.                   5        IN    A        142.251.9.26
ASPMX5.GOOGLEMAIL.COM.                   5        IN    A        74.125.200.26
ALT2.ASPMX.L.GOOGLE.COM.                 5        IN    A        142.251.9.26


Trying Zone Transfers and getting Bind Versions:
_________________________________________________


Trying Zone Transfer for zonetransfer.me on nsztm1.digi.ninja ...
zonetransfer.me.                         7200     IN    SOA               (
zonetransfer.me.                         300      IN    HINFO        "Casio
zonetransfer.me.                         301      IN    TXT               (
zonetransfer.me.                         7200     IN    MX                0
zonetransfer.me.                         7200     IN    MX               10
zonetransfer.me.                         7200     IN    MX               10
zonetransfer.me.                         7200     IN    MX               20
zonetransfer.me.                         7200     IN    MX               20
zonetransfer.me.                         7200     IN    MX               20
zonetransfer.me.                         7200     IN    MX               20
zonetransfer.me.                         7200     IN    A        5.196.105.14
zonetransfer.me.                         7200     IN    NS       nsztm1.digi.ninja.
zonetransfer.me.                         7200     IN    NS       nsztm2.digi.ninja.
_acme-challenge.zonetransfer.me.         301      IN    TXT               (
_sip._tcp.zonetransfer.me.               14000    IN    SRV               0
14.105.196.5.IN-ADDR.ARPA.zonetransfer.me. 7200     IN    PTR      www.zonetransfer.me.
asfdbauthdns.zonetransfer.me.            7900     IN    AFSDB             1
asfdbbox.zonetransfer.me.                7200     IN    A         127.0.0.1
asfdbvolume.zonetransfer.me.             7800     IN    AFSDB             1
canberra-office.zonetransfer.me.         7200     IN    A        202.14.81.230
cmdexec.zonetransfer.me.                 300      IN    TXT              ";
contact.zonetransfer.me.                 2592000  IN    TXT               (
dc-office.zonetransfer.me.               7200     IN    A        143.228.181.132
deadbeef.zonetransfer.me.                7201     IN    AAAA     dead:beaf::
dr.zonetransfer.me.                      300      IN    LOC              53
DZC.zonetransfer.me.                     7200     IN    TXT         AbCdEfG
email.zonetransfer.me.                   2222     IN    NAPTR             (
email.zonetransfer.me.                   7200     IN    A        74.125.206.26
Hello.zonetransfer.me.                   7200     IN    TXT             "Hi
home.zonetransfer.me.                    7200     IN    A         127.0.0.1
Info.zonetransfer.me.                    7200     IN    TXT               (
internal.zonetransfer.me.                300      IN    NS       intns1.zonetransfer.me.
internal.zonetransfer.me.                300      IN    NS       intns2.zonetransfer.me.
intns1.zonetransfer.me.                  300      IN    A        81.4.108.41
intns2.zonetransfer.me.                  300      IN    A        167.88.42.94
office.zonetransfer.me.                  7200     IN    A        4.23.39.254
ipv6actnow.org.zonetransfer.me.          7200     IN    AAAA     2001:67c:2e8:11::c100:1332
owa.zonetransfer.me.                     7200     IN    A        207.46.197.32
robinwood.zonetransfer.me.               302      IN    TXT          "Robin
rp.zonetransfer.me.                      321      IN    RP                (
sip.zonetransfer.me.                     3333     IN    NAPTR             (
sqli.zonetransfer.me.                    300      IN    TXT              "'
sshock.zonetransfer.me.                  7200     IN    TXT             "()
staging.zonetransfer.me.                 7200     IN    CNAME    www.sydneyoperahouse.com.
alltcpportsopen.firewall.test.zonetransfer.me. 301      IN    A         127.0.0.1
testing.zonetransfer.me.                 301      IN    CNAME    www.zonetransfer.me.
vpn.zonetransfer.me.                     4000     IN    A        174.36.59.154
www.zonetransfer.me.                     7200     IN    A        5.196.105.14
xss.zonetransfer.me.                     300      IN    TXT      "'><script>alert('Boo')</script>"
Port Scanning
When we have the IP of the hosts that we want to test, the first thing we should enumerate is their ports. Port Scanning is the process of inspecting TCP and UDP ports and detect what services are running.
There are a lot of different port scanning techniques and tools. We can do it manually using netcat. Since ports may run TCP or UDP protocols, it’s important to consider it when scanning.
TCP Scanning
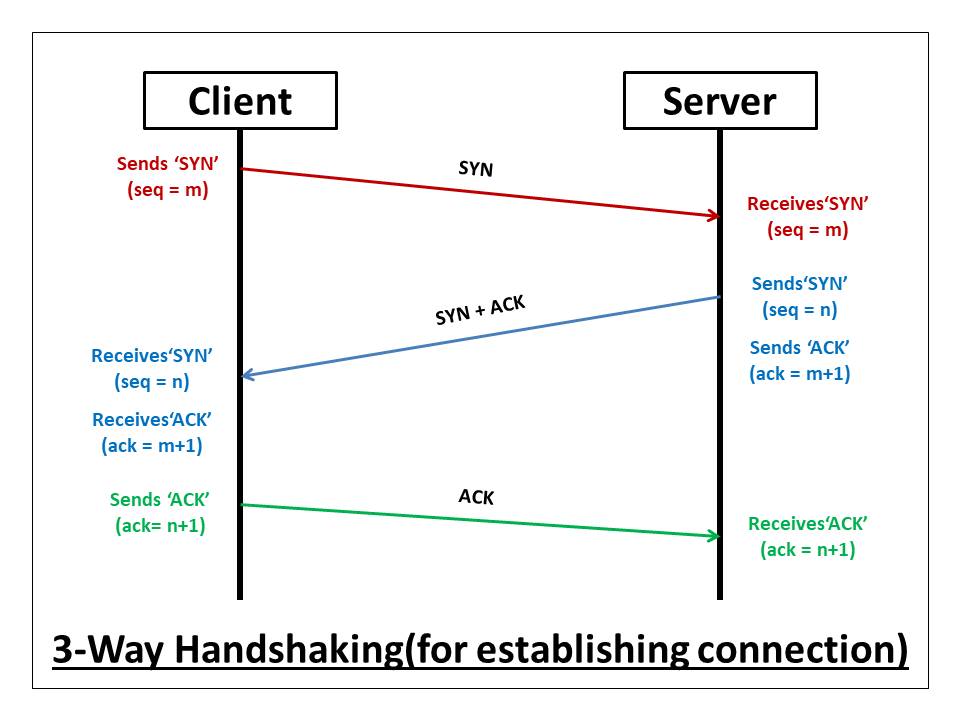
The most used TCP scan technique is the CONNECT scanning, where the scanner host establishes a TCP connection finishing the three-way handshake that the TCP protocol defines. In this protocol, the host sends a TCP packet with the SYN flag to the destination port. If that port is open, that server sends back a packet with the SYN-ACK packet, which has the SYN flag and acknowledges the first received packet. Finally, the client sends acknowledges the packet that the server sent with an ACK packet and the connection is established. This scanning technique considers the port open if the handshake is finished. The next picture summarizes the handshake protocol:
We can do this with nectat by doing: nc -nvv -w 1 -z 1.1.1.1 1-99 where -w specifies a connection timeout (1 sec) and -z to specify that we don’t want to send any data. In this example we will only scan all the ports from 1 to 99.
UDP Scanning
UDP is stateless, this means that doesn’t ensure that the packets are correctly received because packets are not acknowledged. In this situation, a port may be open and receive the packet, but will send no answer back to the client. This will depend on how the application running on that port handles UDP packets. However, when a port is closed, by design, the response should be an ICMP packet with the port unreachable. However, if a port is filtered by a firewall, it’s difficult to know if the port is filtered or open.
Nmap
If we talk about tools, nmap is the best one. A default nmap scan will scan just the first 1000 ports, but we can scan all of them using the -p- option. Nmap has a huge amount of options an scan types and we are not going to define all of them here, just the most important.
Stealth/SYN Scann: Is the default scanning technique. This scan sends the SYN packets, but doesn’t finish the full TCP handshake. If the port is open, the SYN-ACK packet will be received and the port will be marked as open. Since the TCP is not finished, the information is not passed to the application layer and will not appear in the application logs. This scan requires raw socket privileges (run nmap with sudo).
TCP Connect Scann: This is the default scan used when nmap doesn’t have privileges. This technique has been described when talking about TCP scan previously. We can use the -sT option to tell nmap that we want to use this scan type.
UDP Scann: As mentioned before, when doing UDP scans is difficult to know if a port is open or not. However, for de common ports used for known applications, nmap generates specific protocol packets to get a specific response.
Nmap scans can generate a lot of traffic. If we want to scan large networks, we can first do a scan using the -sn option to do a host discovery first. Once we have the hosts that are up, then we can perform more aggresive scans against them scanning all their ports, detecting OS, using scripts, etc. I suggest to read the nmap manual page to know all options offered.
SMB Enumeration
Server Message Block (SMB) is a protocol that due to its complex implementation it has security problems. SMB is a client/server protocol that allows access to shared files, directories and other resources such as printers, routers, etc. This protocol uses the port 445 and the TCP protocol.
NetBIOS Service
NetBios is a network protocol that allows distributed applications to access each other’s network services. This protocol runs on port 139 and is independent from the SMB protocol. Modern implementations of SMB can work without NetBIOS, but both protocols are often enabled together.
We can use nmap to scan a host and detect this service: nmap -v -p 139,445 1.1.1.1
There are other tools to identify NetBIOS information such as nbtscan
Nmap SMB NSE Scripts
We mentioned that nmap is a super powerful tool. It has scripts that can help us to enum different services better such as SMB. The scripts are in /usr/share/nmap/scripts directory:
1
2
3
4
5
6
7
8
9
10
11
12
13
14
15
16
17
18
19
20
21
22
23
❯ ls -l /usr/share/nmap/scripts/smb*
.rw-r--r-- root root 44 KB Sun Aug 8 19:40:33 2021 /usr/share/nmap/scripts/smb-brute.nse
.rw-r--r-- root root 5.2 KB Sun Aug 8 19:40:33 2021 /usr/share/nmap/scripts/smb-double-pulsar-backdoor.nse
.rw-r--r-- root root 4.7 KB Sun Aug 8 19:40:33 2021 /usr/share/nmap/scripts/smb-enum-domains.nse
.rw-r--r-- root root 5.8 KB Sun Aug 8 19:40:33 2021 /usr/share/nmap/scripts/smb-enum-groups.nse
.rw-r--r-- root root 7.9 KB Sun Aug 8 19:40:33 2021 /usr/share/nmap/scripts/smb-enum-processes.nse
.rw-r--r-- root root 27 KB Sun Aug 8 19:40:33 2021 /usr/share/nmap/scripts/smb-enum-services.nse
.rw-r--r-- root root 12 KB Sun Aug 8 19:40:33 2021 /usr/share/nmap/scripts/smb-enum-sessions.nse
.rw-r--r-- root root 6.8 KB Sun Aug 8 19:40:33 2021 /usr/share/nmap/scripts/smb-enum-shares.nse
.rw-r--r-- root root 12 KB Sun Aug 8 19:40:33 2021 /usr/share/nmap/scripts/smb-enum-users.nse
.rw-r--r-- root root 1.7 KB Sun Aug 8 19:40:33 2021 /usr/share/nmap/scripts/smb-flood.nse
.rw-r--r-- root root 7.3 KB Sun Aug 8 19:40:33 2021 /usr/share/nmap/scripts/smb-ls.nse
.rw-r--r-- root root 8.6 KB Sun Aug 8 19:40:33 2021 /usr/share/nmap/scripts/smb-mbenum.nse
.rw-r--r-- root root 8.0 KB Sun Aug 8 19:40:33 2021 /usr/share/nmap/scripts/smb-os-discovery.nse
.rw-r--r-- root root 4.9 KB Sun Aug 8 19:40:33 2021 /usr/share/nmap/scripts/smb-print-text.nse
.rw-r--r-- root root 1.8 KB Sun Aug 8 19:40:33 2021 /usr/share/nmap/scripts/smb-protocols.nse
.rw-r--r-- root root 62 KB Sun Aug 8 19:40:33 2021 /usr/share/nmap/scripts/smb-psexec.nse
.rw-r--r-- root root 5.1 KB Sun Aug 8 19:40:33 2021 /usr/share/nmap/scripts/smb-security-mode.nse
.rw-r--r-- root root 2.4 KB Sun Aug 8 19:40:33 2021 /usr/share/nmap/scripts/smb-server-stats.nse
.rw-r--r-- root root 14 KB Sun Aug 8 19:40:33 2021 /usr/share/nmap/scripts/smb-system-info.nse
.rw-r--r-- root root 7.3 KB Sun Aug 8 19:40:33 2021 /usr/share/nmap/scripts/smb-vuln-conficker.nse
.rw-r--r-- root root 23 KB Sun Aug 8 19:40:33 2021 /usr/share/nmap/scripts/smb-vuln-cve-2017-7494.nse
...
We can use these scripts while running nmap with the --script option: nmap -v -p 139,445 --script=smb-os-discovery 1.1.1.1. In this example the script will try to identify the OS. We can make use of different scripts to check for known vulnerabilities or exploits.
NFS Enumeration
Network File System (NFS) is a distributed file system protocol. While SMB is often used on Windows OS, NFS is mostly used on Unix OS. This protocol is not secure by design and it can lead to sensitive information exposure.
NFS is an RPC service (Remote Procedure Call), so in order to serve the service to the clients, it makes use of portmapper and rpcbind. Portmapper maps RPC services to the ports they are listening on. When the client wants to use an RPC service, it contacts with the portmapper with the program number and then, portmapper redirects the client to the proper port number (where the requested program is running). Portmapper runs on port 111.
Like SMB, we can enumerate this service using nmap with some scripts like rpcinfo, which will find the registered RPC services: nmap -sV -p 111 --script=rpcinfo 1.1.1.1.
Nmap NFS NSE Scripts
Once we have detected NFS running on that host, we can use the NFS scripts that nmap has to collect additional information such as directories that can be mounted.
Let’s imagine that after running nmap -p 111 --script nfs* 1.1.1.1 we see that the \home directory can be mounted in our system. Then we can use the mount command to do it (and the -o nolock option to disable file locking).
1
2
3
4
5
❯ mkdir external_home
❯ sudo mount -o nolock 1.1.1.1:/home ~/external_home/
❯ cd external_home
❯ ls
victim1 victim2 victim3
The victim1, victim2, victim3 home directories are users from the victim machine and they are mounted on our system now. However, maybe we won’t have permission to access them because of the users needed. However, we can check the permissions with ls -la and see which users are able to access them. Then, we can create this users using the adduser command in our machine and do a su to that user. Then we will have an “imitation” of that user in our machine and we will be able to access these files/directories.
SMTP Enumeration
The Simple Mail Transport Protocol (SMTP) supports several commands that can give us interesting information. A VRFY request asks the server to verify an email address. The EXPN asks the server for the membership of a mailing list. Both commands can be used to search for existing users on a mail server.
SNMP Ennumeration
The Simple Network Management Protocol (SNMP) can be misconfigured and abused by attackers. It runs on port 161 Since it uses UDP, is vulnerable to IP spoofing and replay attacks. Some of its protocols send unencrypted data and they have weak authentication schemes.
SNMP MIB Tree
The SNMP Management Information Base (MIB) is a database that contains information about the network management. This DB is represented like a tree, where branches are different organizations or functions and leaves are specific variable values.
| 1.3.6.1.2.1.25.1.6.0 | System Processes |
| 1.3.6.1.2.1.25.4.2.1.2 | Running Programs |
| 1.3.6.1.2.1.25.4.2.1.4 | Processes Path |
| 1.3.6.1.2.1.25.2.3.1.4 | Storage Units |
| 1.3.6.1.2.1.25.6.3.1.2 | Software Name |
| 1.3.6.1.4.1.77.1.2.25 | User Accounts |
| 1.3.6.1.2.1.6.13.1.3 | TCP Local Ports |
Scanning for SNMP
Since SNMP uses UDP, if we use nmap we have to use the -sU option to do a UDP scan. Alternatively, we can use a tool like onesixtyone bit it will need to build text files containing community strings. A community string is like an ID that allows access to resources.
Once we have identified an SNMP service, we can start doing queries to extract data.
Windows SNMP Ennumeration
We can use the snmpwalk tool to query for data. We have to provide a community string. The community string for read-only data is public in most cases.
By doing snmpwalk -c public -v1 -t 10 1.1.1.1 we can enumerate all the MIB tree. However, if we want to get a specific value, such as user accounts, then we have to use the number related to this resource (specified in the previous table): snmpwalk -c public -v1 -t 10 1.1.1.1 1.3.6.1.4.1.77.1.2.25.